The Treasure Island quest is a quest given to you by Gorjan in the Village of Phryn. Your objective for this quest is to visit the lost island of Ghula, find something of importance for Gorjan that reminds him of his father, and make it off the island alive.
This guide relies heavily on compass directions. Utilize the compass on the game interface.

Treasure Islan Map
Beginning[]
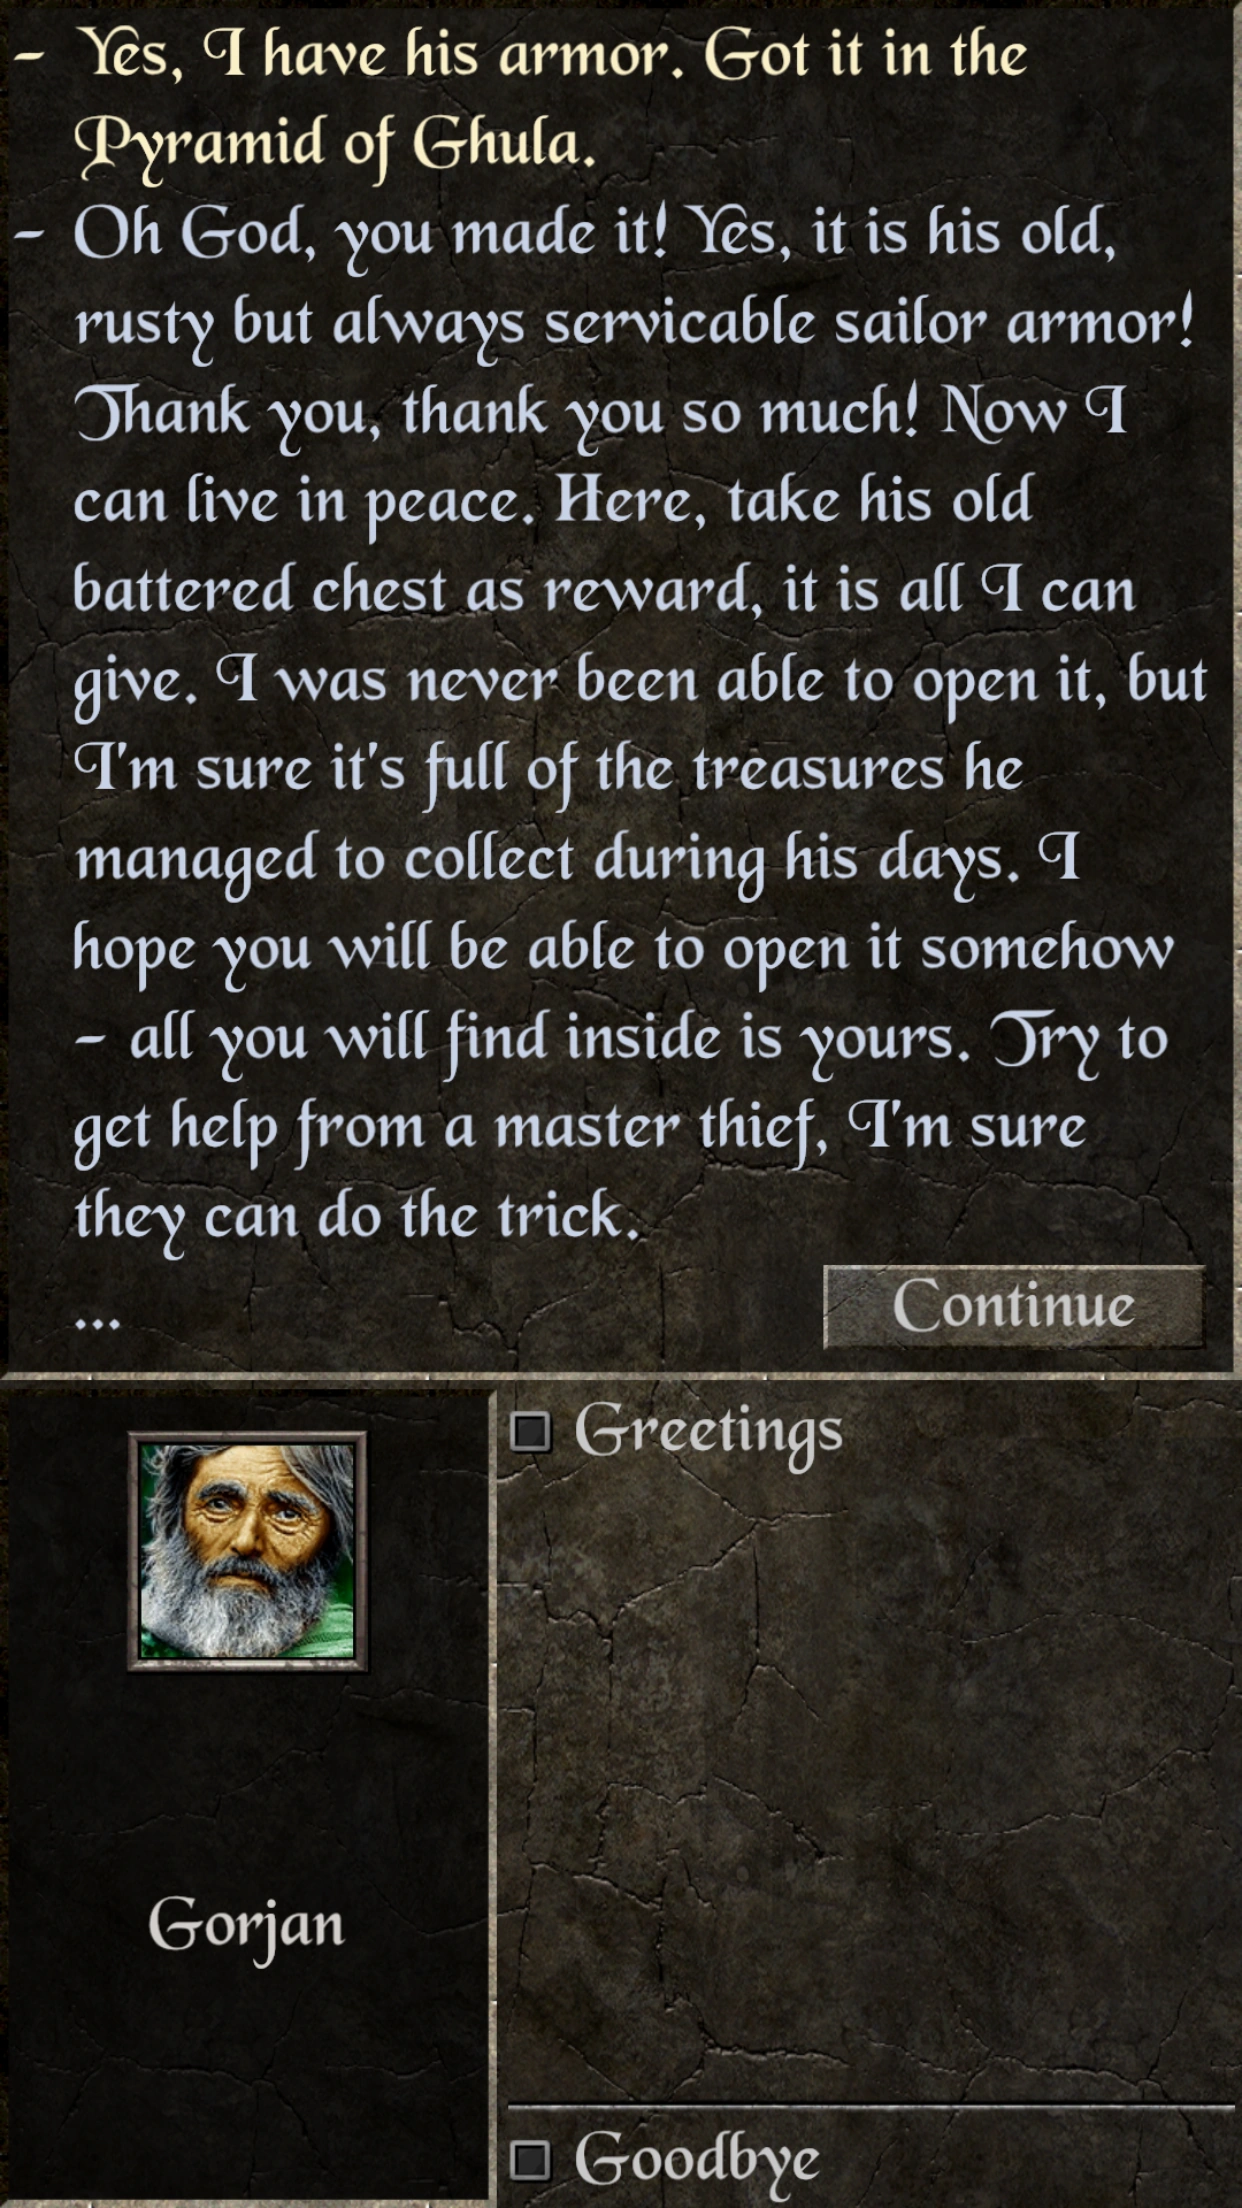
- To begin this quest speak to Gorjan in the Village of Phryn. Buy his map off of him for 1000 coins.
- Head to the Port of Mithria or Port of Matras and speak to Captain Hanty (Mithria) or Captian Verra (Matras). Ask him about the island. He will offer to drop you off (and leave) for 200 coins.
WARNING: Make sure to SAVE before you go to this island. After you land on the island you CANNOT exit until this part of the quest is completed. Teleporting or resting is blocked while you are on the island. Make sure you bring plenty of full or strong healing and mana potions. If you are lacking in Magic resistance, it is advised to bring an adequate supply of Resist magic potions. If you have tasks you would like to do before you leave, do them now.
(you should repair at blacksmith and rest at inn, have mortar and do not forget to recharge healing wands)
The Lonely, Scary Island[]
- The captain drops you off on this island and quickly retreats. You should take note of the world map now, or rather the lack of it. Your area map has been disabled. If you click on the world map it will show that you are in the unmapped area somewhere north of Matras.
- Be careful as you traverse the island if you have low Magic resistance, as Spectres roam the island. They cast powerful undead magic attacks that can easily kill you if you are unaware of your surroundings. It is advisable to have antimagic items such as an Ancient Helmet.
- If you go to the northwest part of this island (click on the full world map to consult where this is), there will be a metal button. If you walk over it some spikes will disappear in the eastern part of the island. This step is not necessary to complete the quest.
- Go north, following the trail of discolored water to reach a stone buidling with an entrance on the northern side.
- Enter the cave and fight the Skull Keeper. He will drop an item and a Red Skull. Pick up the Red Skull, you will need it for the next step. Also in this cave are healing and mana orbs and an item shelf behind a spider web. (It is advisable to have cure paralysis potions, as the skull keeper still has the cyclops' chance to paralyze. But go profile-active if you paralyzed for 2 turns you should disenchant other effects/heal/recover or skip a turn if not any).
- Go southeast and you will find a pyramid. Go to its eastern face and there will be a bookstand. If you didn't press the metal plate in the northwest part of this island then there will be a set of spikes in front of the bookstand. Use the Red Skull on the bookstand and the eastern face of the pyramid will be blown off, revealing a wall with a crack in it. Attack the wall and enter the pyramid.
The Pyramid of Ghula[]
- You are now in the Pyramid of Ghula. Loot the vases, slice the spider web, kill the mummy, and go up the stairs to the west. Take note of the pillars to your left and right. Use the mana sphere and the well of healing before the stairs if you need to.
- You are now in a blue-colored room. From your current point of view there is a lever to the left/north blocked by a web, some stairs to the right/south blocked by a green force field, and an item shelf ahead of you/to the east blocked by a green force field. Pull the lever and go back down the stairs from which you came.
- Walk forward and you will see the pillar to the north (now to your left) has vanished. At the set of spikes there are 3 item shelves with some helpful items to the left/west. Take the rope down a level.
- To the left/east there is a vase with a button. Hit the button. All that is past the teleporter to the west are two Ancient Mummies and healing fountains. If you want to kill the mummies, you can, otherwise ignore the teleporter and come back to it later. Go back up the rope and up the stairs to the west.
- You will see that the stairs to the right/south are no longer blocked by the magical barrier. Go down those stairs. Take the items off the shelf to the left/west and go down the rope to the east.
- Walk forward and there will be a button on the wall to the left of you. Use the Well of Protection if you wish and go back up the rope you climbed down. Take the stairs to the south to find yourself back in the blue-colored room.
- The shelf to the east is accessible now, so take the key it holds. Take the stairs to the south, the rope to the east, and more stairs to the south.
- When you attacked with extractly 2 undead, cast harm undead. For one try to use cure wounds touch (yes, undead loses life).
- Slash the web, unlock the door, and kill the Ancient Mummy. Now this is where it may get tricky. You have to navigate a teleporter maze. You have to flip a lever and then make it back to the stairs. Here is a guide:
- For each of these steps you will be facing north. Face north in between the two starting teleporters and make these moves:
- left, right, left, turn and pull lever, face north, forward, forward, forward, right, right
- For some items make these moves:
- right, forward, turn and get items, face north, forward, left, left, left, turn and pull lever, face north, forward, forward, forward, right, right
- For each of these steps you will be facing north. Face north in between the two starting teleporters and make these moves:
- Now take the stairs to the south, the rope to the east, the stairs to the south, the stairs to the west, forward a ways then the rope to the north, and finally the teleporter to the west.
- Go south into the next room (use the wells if you wish). Hit the lever, and then head back to the teleporter. Do not enter the doors to the left and right of the lever as they will close automatically.
- In this room the wall to the south is now gone. Enter the room, kill the mummies, and avoid the gaping hole in the floor. Pull the lever to the west and fall through the hole.
- You may now enter the doors to the east as they will not close when you when you approach them. Take the keys from the key holder inside. Head north a ways, unlock the blue door to your right, and take the Brass Ancient Idol. Turn around and unlock the gold/red door and take the Golden Ancient Idol. Head back into the teleporter.
- Exit the teleporter, go south, then go west, avoiding the hole. Place the Golden Ancient Idol on the alcove to the right (click alcove, click yellow arrow, click Golden Ancient Idol, click yellow arrow). Go around the pillar to the alcove on the other side and place the Brass Ancient Idol there. This will activate a teleporter and remove a column in the room.
- Go east, avoiding the hole. There is a Well of Healing to the left/north, a Well of purification to the right/south, and an item shelf on the east wall. Use the teleporter.
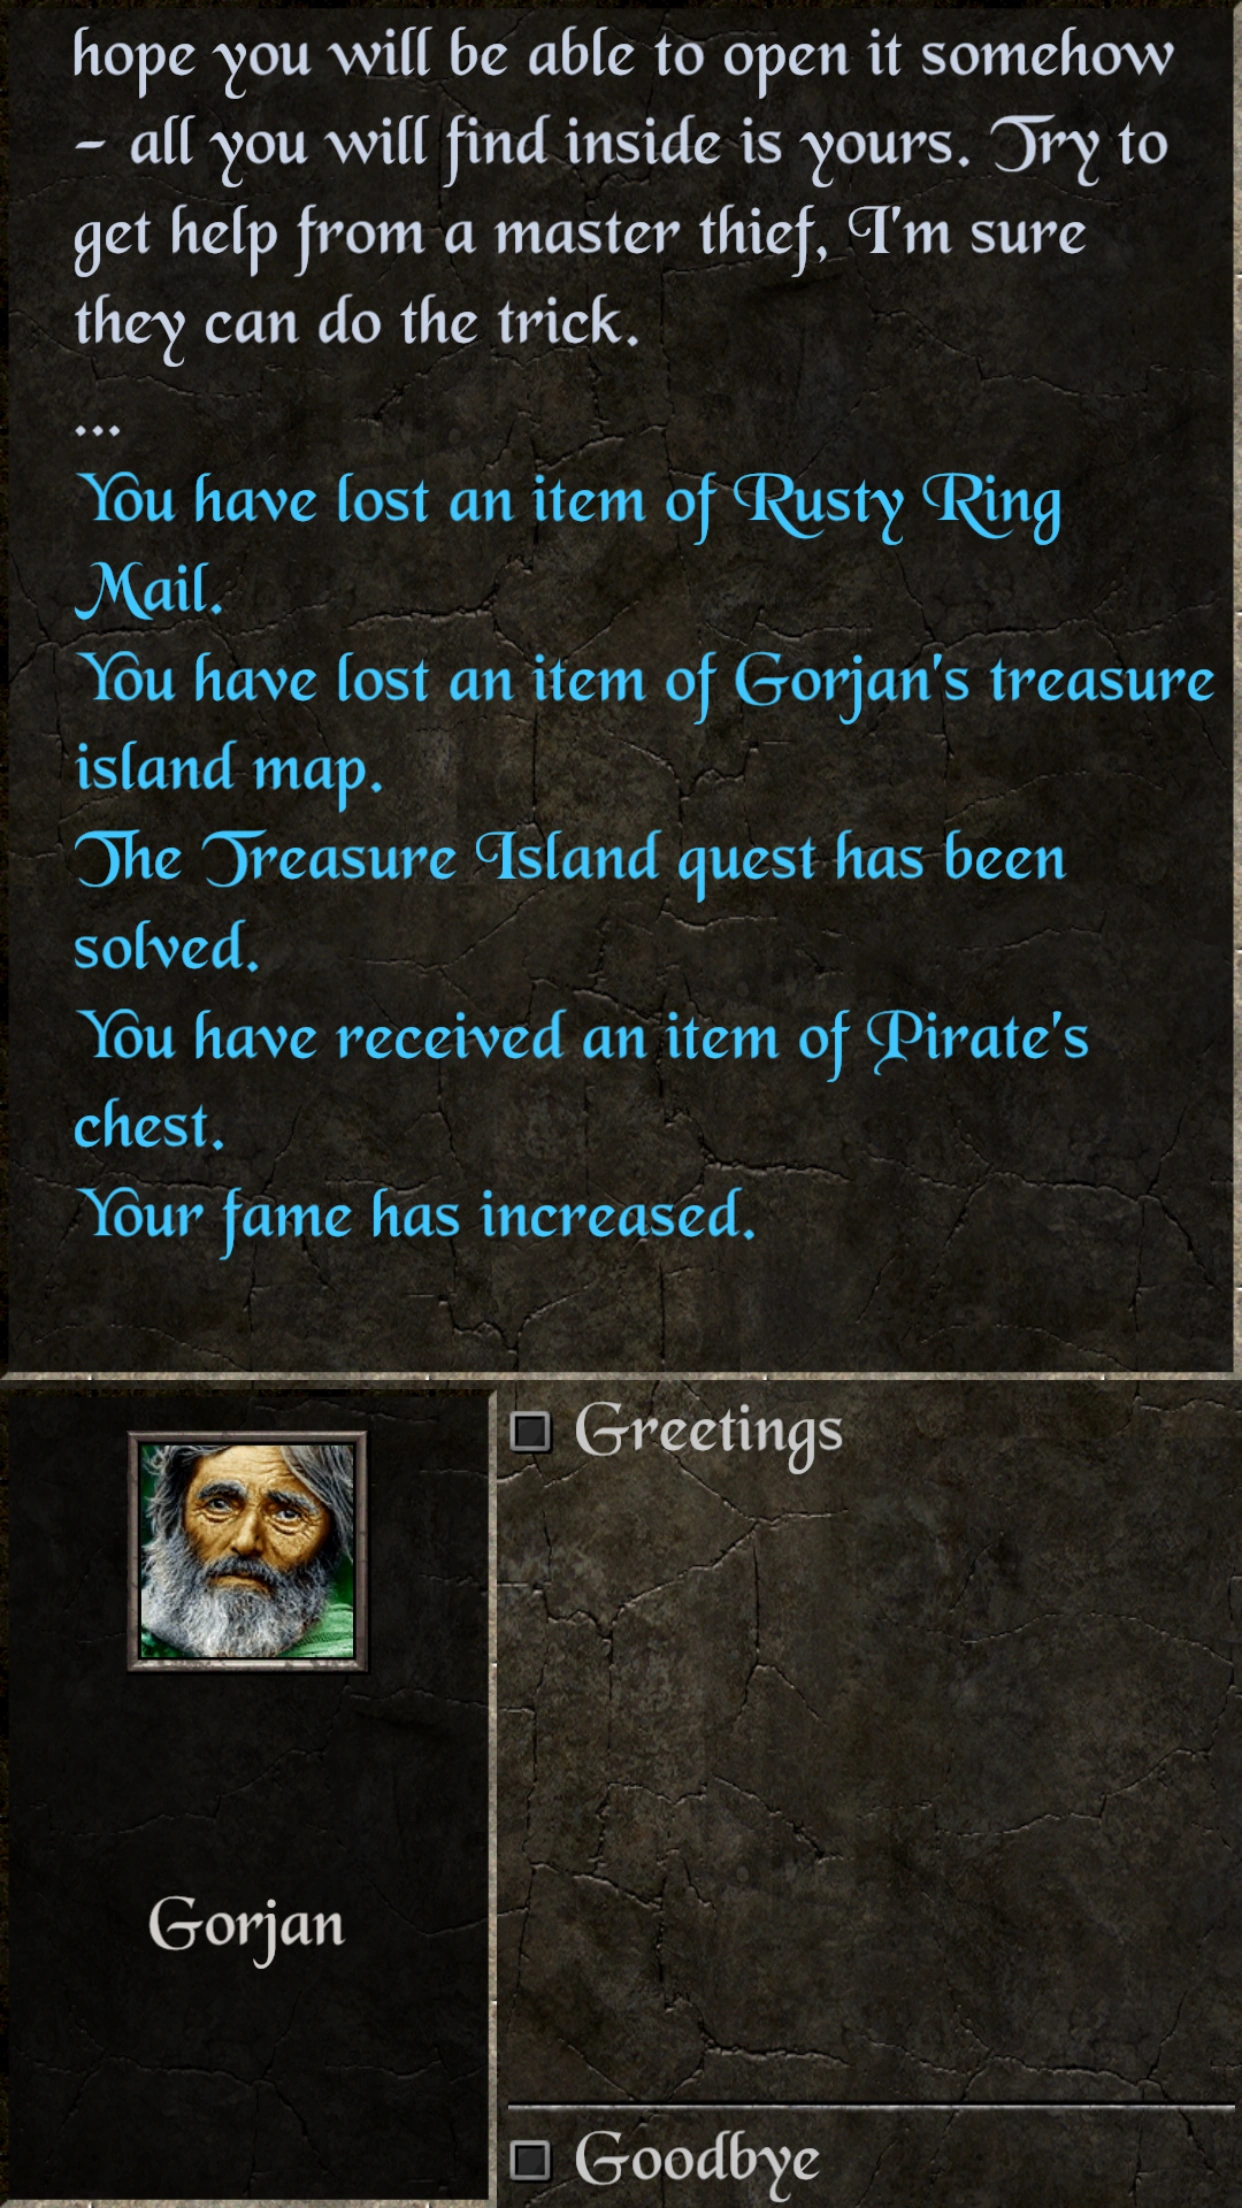
- You are almost off the island! Kill the ancient mummies, then go through the self-closing doors to the west. Before going through the teleporter, MAKE SURE you turn around and take the Rusty Ring Mail from the shelf. You need this item to complete this quest!
Crime[]
You do not need to commit crimes further if you played Archmage's Gloves Quest (crime only if you charge), Destroy the Demon Quest, Holy Chrism Quest, Nobleman's Inheritance Quest and SOLVED Rubor's Ring (minimum you have this item) and Deliver Lennora's nightmare potion (+do not poison Rozalia and failed Ransom money). So you may go to Mayana to clear crime after returning.
Spoiler: Thieves guild is in "secure perimeter" in Vastares.
Guild quests following this do not affect crime rating.
Closing[]
- Enter the teleporter, which will take you back to the Port of Matras. Make your way back to Phryn and talk to Gorjan. Congratulations, your quest is complete.
Here is the Dialog with Gorjan, he provides you with a Pirate's Chest that needs to be unlocked with the use of a Master Thief.
Treasure Island Reward - Part 1
Treasure Island Reward - Part 2